
Outlign API
v1.0 Documentation
Authentication
The Outlign API uses OAuth2 for secure authentication. This allows users to grant your application access to their data without sharing their credentials.
Get your API client
Every integration needs an API client — a client ID and client secret that identify your application to Outlign. You create one yourself from your company settings; no approval step is required.
You need manager permissions on the company you are creating the client for. The client belongs to the company rather than to the person who created it, so any manager can see and revoke it, and it keeps working when people join or leave the team.
1. Open Settings → Integrations
In Outlign, go to your company settings and open the Integrations tab. Scroll to the API Clients section and choose Create client.

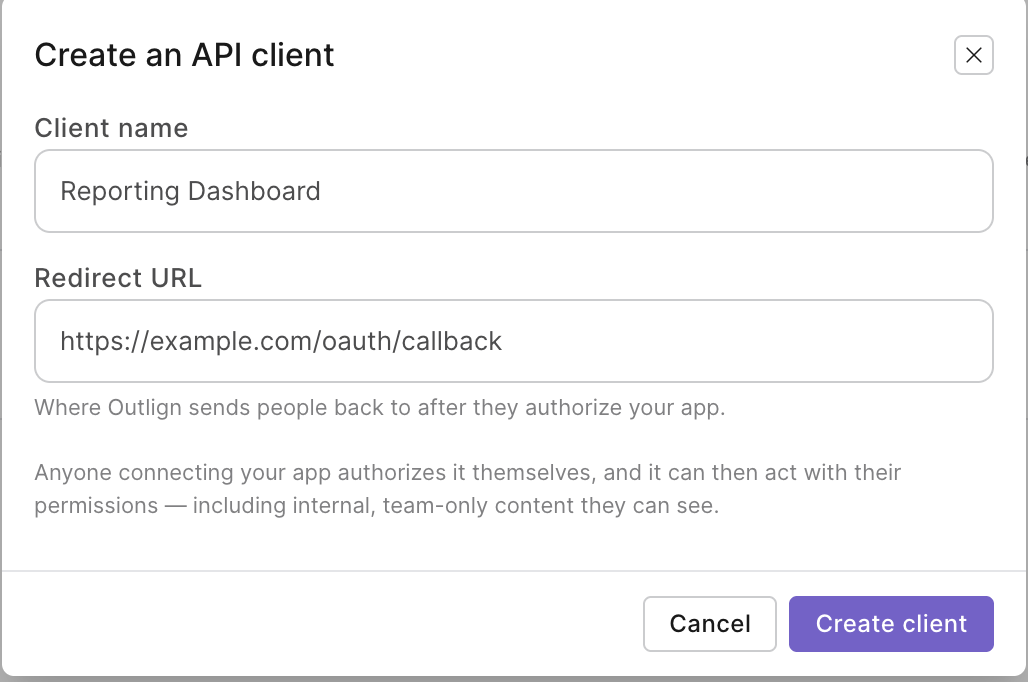
2. Name your client and set a redirect URL
Give the client a name your team will recognise, and enter the redirect URL Outlign should send
people back to once they have authorized your app. This must exactly match the
redirect_uri you send in the authorization request.
3. Copy your credentials
Outlign shows your client ID and client secret once. Copy the secret and store it somewhere safe — it cannot be retrieved again. If you lose it, revoke the client and create a new one.
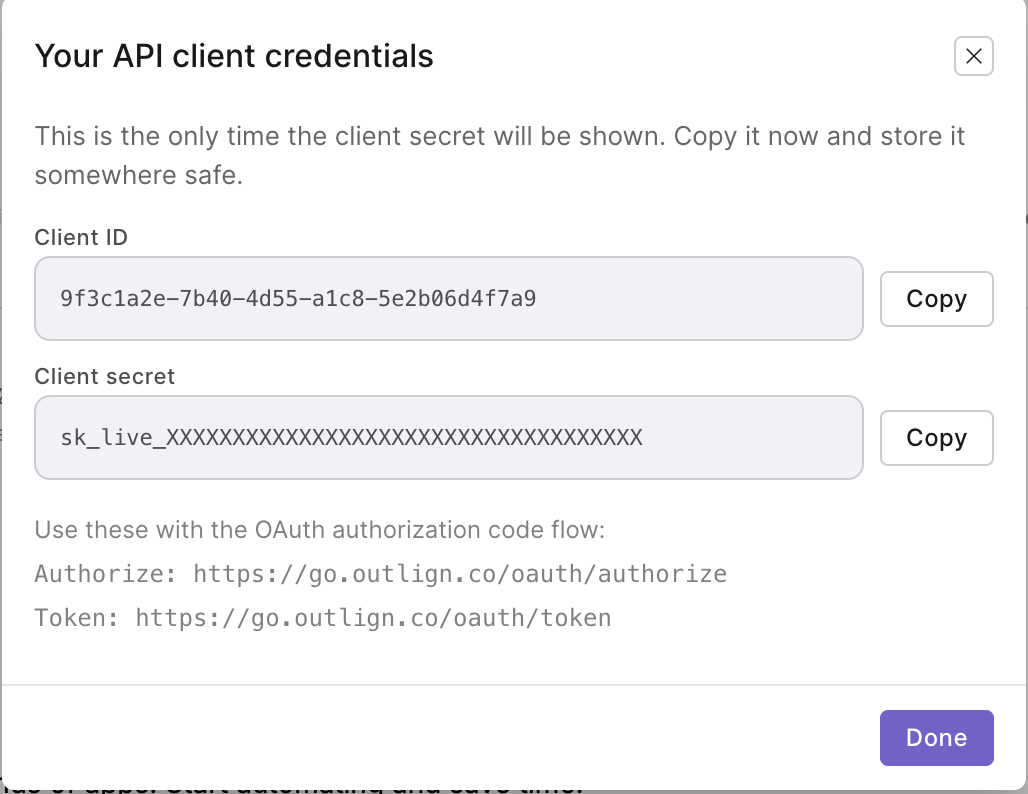
Keep the secret server-side. Never ship your client secret in a browser app, mobile app, or anywhere else a user could read it. Anyone who authorizes your client grants it their own level of access, including internal, team-only content they can see.
OAuth2 Flow Overview
Outlign implements the standard OAuth2 authorization code flow. The process involves redirecting users to authenticate with Outlign, then exchanging the authorization code for access tokens.
Authorization Flow Steps
Redirect to Authorization URL
Send users to Outlign's authorization endpoint
User Grants Permission
User logs in and authorizes your application
Exchange Code for Tokens
Your app receives an authorization code and exchanges it for access tokens
Make Authenticated Requests
Include the access token in API requests
Step 1: Authorization URL
Direct users to the authorization URL with the required parameters:
GET https://go.outlign.co/oauth/authorizeParameters
| Parameter | Type | Description |
|---|---|---|
| client_id | string | Your application's client ID |
| redirect_uri | string | URL to redirect to after authorization |
| response_type | string | Must be "code" |
| scope | string | Requested permissions: "outlign:all" |
| state | string | Optional security parameter to prevent CSRF attacks |
Example
Request the outlign:all scope. A token issued with this scope can read and write
everything the authorizing user can access in Outlign.
GET https://go.outlign.co/oauth/authorize
  ?client_id=YOUR_CLIENT_ID
  &redirect_uri=YOUR_REDIRECT_URI
  &response_type=code
  &scope=outlign:all
Step 2: Exchange Code for Access Token
After the user authorizes your application, they'll be redirected to your redirect_uri with an authorization code. Exchange this code for an access token:
POST https://go.outlign.co/oauth/token
Content-Type: application/x-www-form-urlencoded

grant_type=authorization_code
&client_id=YOUR_CLIENT_ID
&client_secret=YOUR_CLIENT_SECRET
&code=AUTHORIZATION_CODE
&redirect_uri=YOUR_REDIRECT_URI
Response
{
  "access_token": "eyJ0eXAiOiJKV1QiLCJhbGciOiJSUzI1NiJ9...",
  "refresh_token": "def50200c7dd...",
  "token_type": "Bearer",
  "expires_in": 86400
}
Step 3: Making Authenticated Requests
Include the access token in the Authorization header of your API requests:
GET https://go.outlign.co/api/v1/companies
Authorization: Bearer YOUR_ACCESS_TOKEN
Accept: application/json
Token Refresh
Access tokens expire after 24 hours (expires_in: 86400). Refresh tokens are valid for
90 days. Use the refresh token to obtain a new access token without requiring user
re-authentication:
POST https://go.outlign.co/oauth/token
Content-Type: application/x-www-form-urlencoded

grant_type=refresh_token
&client_id=YOUR_CLIENT_ID
&client_secret=YOUR_CLIENT_SECRET
&refresh_token=YOUR_REFRESH_TOKEN
Important: Store refresh tokens securely and implement automatic token refresh in your application to maintain uninterrupted API access.
Testing Authentication
Verify your authentication is working by making a request to the user info endpoint:
GET https://go.outlign.co/api/v1/me
Authorization: Bearer YOUR_ACCESS_TOKEN
Accept: application/json
Response
/me returns the authenticated user directly, not wrapped in data. Names are
split into first_name and last_name, with a combined full_name
also provided.
{
  "id": 123,
  "first_name": "John",
  "last_name": "Doe",
  "email": "user@example.com",
  "email_verified_at": "2023-01-01T12:00:00.000000Z",
  "avatar": "avatars/abc123.jpg",
  "timezone": "Australia/Melbourne",
  "position": "Design Lead",
  "colour": "#9177FB",
  "email_notification_frequency": "immediate",
  "created_at": "2023-01-01T12:00:00.000000Z",
  "updated_at": "2023-01-01T12:00:00.000000Z",
  "full_name": "John Doe",
  "avatar_url": "https://go.outlign.co/storage/avatars/abc123.jpg"
}
Note: Fields may be added to this response over time, so read only the ones you
need. id, email, first_name, last_name and
full_name are stable.
Error Handling
Authentication errors return appropriate HTTP status codes and error messages:
401 Unauthorized
{
  "message": "Unauthenticated."
}
403 Forbidden
{
  "message": "This action is unauthorized."
}